Segmentation Wizard Interface
The Segmentation Wizard provides an easy-to-use, guided workflow for training deep learning and machine learning (classical) models for semantic image segmentation. Just some of the many key features and benefits of the Segmentation Wizard are listed below.
- Automatically splits available data into training, evaluation, and test sets.
- Works on frames that are created automatically on the visible part of the data.
- Users apply their specific knowledge to identify features of interest by labeling a limited subset of the image data that is defined by frames. Advanced knowledge of machine learning and deep learning algorithms is not required.
- Direct and quick feedback with previews of model predictions. New frames can be filled automatically with the best model prediction, based on the highest-ranked prediction.
- Models can be fine-tuned by adding additional training data to problematic regions.
Right-click the required input image data in the Data Properties and Settings panel and then choose Segmentation Wizard in the pop-up menu to open the Segmentation Wizard context, shown below. The workspace includes a large view area in which you can label the voxels within a frame and preview model predictions, as well as a panel on the right sidebar that includes the Input, Models, and Settings tabs. Tools to adjust views and label classes are available on the panels on the left sidebar.
Segmentation Wizard interface
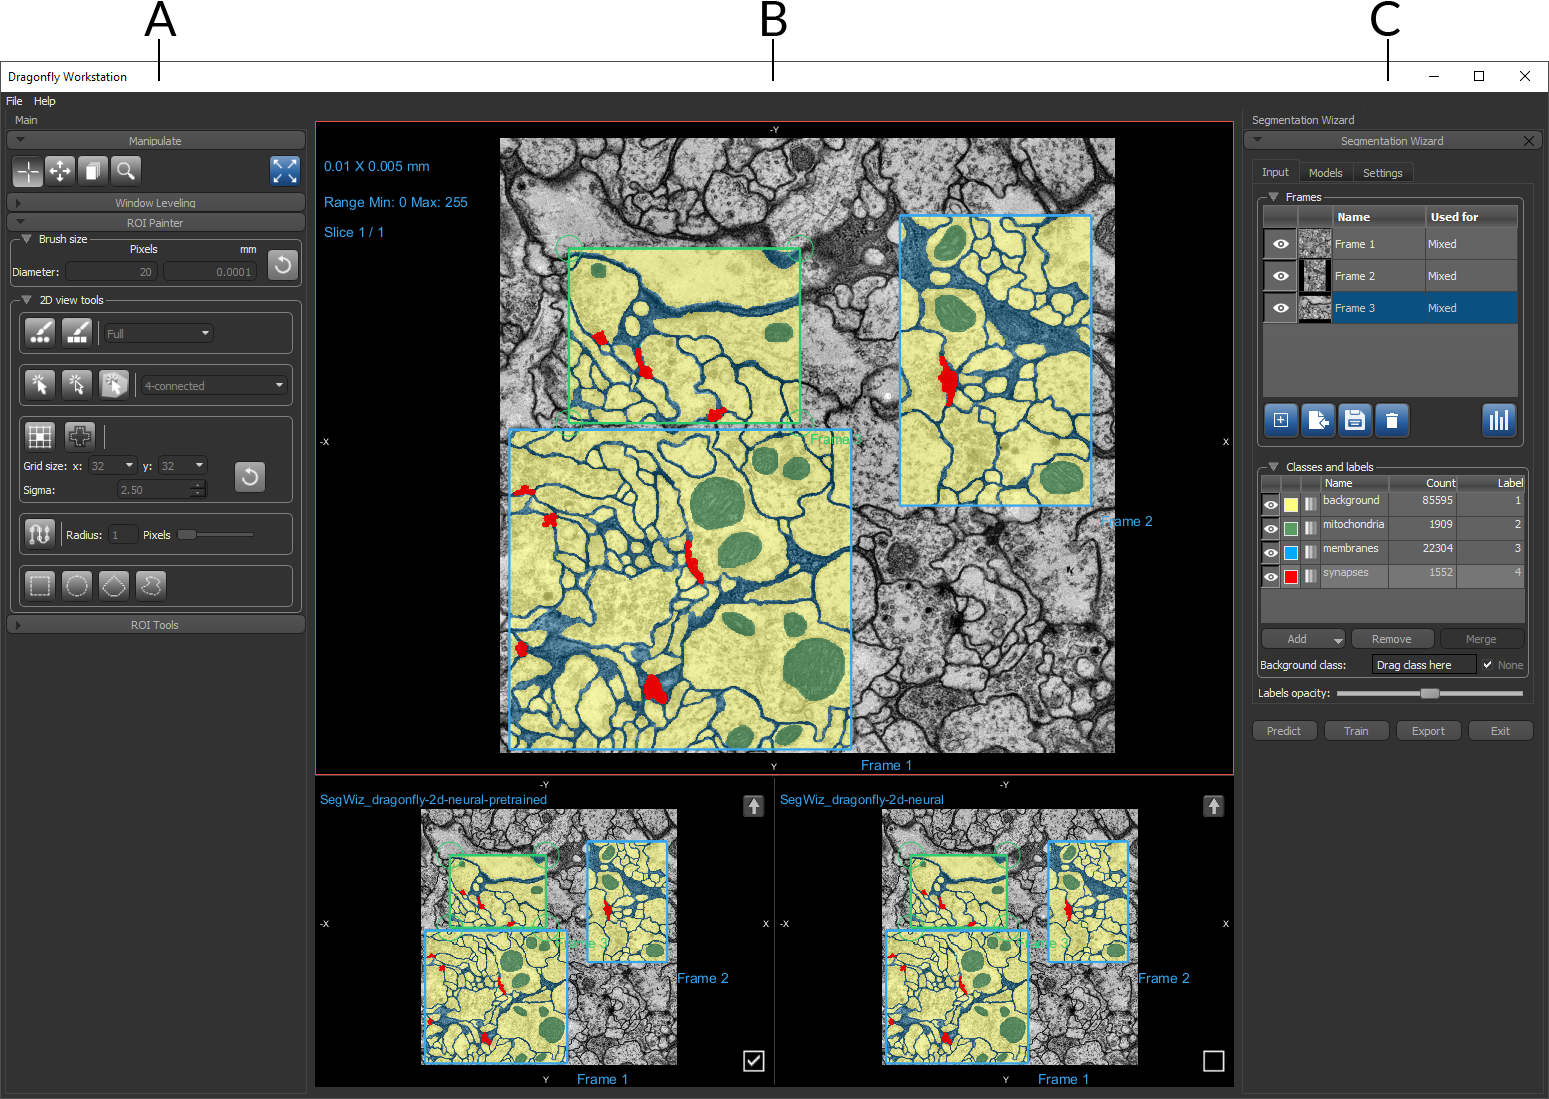
A. Tools panels B. Workspace views C. Segmentation Wizard panel
The tools on the left sidebar let you manipulate views (see Using the Manipulate Tools), adjust window leveling (see Window Leveling), and label classes for model training (see ROI Painter and ROI Tools).
Views of the selected dataset(s) are arranged in the workspace so that the original view occupies two-thirds of the workspace by default while up to three model prediction views share the bottom third.
Workspace views

A. Working view B. Predictions
Working view… The working view is where you label features of interest for training models. You can use any of the tools on the ROI Painter panel to label your classes (see ROI Painter), as well as apply the operations available on the ROI Tools panel (see ROI Tools). You can also import multi-ROIs that were prepared beforehand, as well as fill frames from model predictions. If you are working with multi-modality images, you can choose which image is displayed in the view.
Predictions… These views display the model prediction(s) for the current frame. Each model prediction view includes the name of the corresponding model and includes the following controls:
- Click the Up arrow to fill the current frame with the model prediction.
- The Default Model checkbox lets you select the model that will be used to automatically fill frames whenever the 'Automatically fill new frames with best prediction' option is selected on the Settings tab (see Settings Tab).
The panel on the right sidebar of the Segmentation Wizard, shown below, contains a number of tabs — Input, Models, and Settings — that you access to label frames for training, choose the model(s) you want to be trained, and set your preferences for training.
Segmentation Wizard panel
The following options are available on each tab of the Segmentation Wizard panel.
| Description | |
|---|---|
| Predict | Applies the selected model(s) to the prediction view(s). You should note that a frame can be filled by a prediction by right-clicking the frame and then choosing Fill 'Frame x' from Prediction. |
| Train | Starts the training process. |
| Export | Lets you export the Segmentation Wizard session group, which includes all objects, frames and labeled classes, trained models, and training parameters, in the Dragongly Object file (*.ORSObject extension) format (see Exporting and Importing Session Groups). |
| Exit |
Closes the Segmentation Wizard context.
Note The Publish Models dialog, shown below, appears whenever you exit the Segmentation Wizard.
Note You need to 'publish' a model to make it available to other features of Dragonfly, such as Segment with AI and the Deep Learning Tool. You can choose the models to publish and edit the default published name in the Publish Models dialog. |

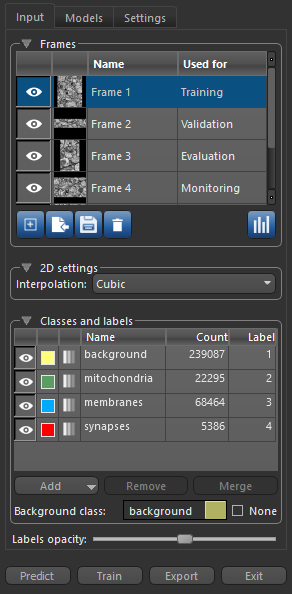
The Input tab on the Segmentation Wizard panel, shown below, provides the opportunity to add frames on the image data for labeling classes. Labeling features of interest within frames can be accomplished with the ROI Painter tools. Frames can also be filled from previously segmented multi-ROIs or from model predictions.
Input tab
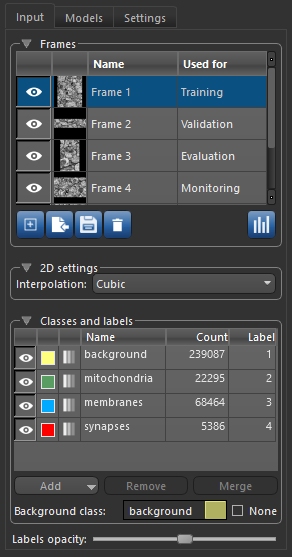

Frames define the inputs (training data) for model training and you can add as many frames as required to fully train your models. You can also designate a frame for a particular purpose, such as training, validation, evaluation, or visual feedback. By default, frames are set to 'mixed', in which case the frame will be randomly split into training, validation, and evaluation patches.
The following options and controls are available in the Frames box, shown below.
Frames

| Icon | Description | |
|---|---|---|
| Show/Hide Frame |
|
Lets you show or hide a frame and the highlight applied to labeled voxels within the frame. |
| Thumbnail |
|
Is a representative image of the data within a frame. |
| Name | - | Is the assigned frame name, which can be edited. |
| Used for | - |
Lets you designate a frame for a particular purpose, as described below.
Not used… Excludes the frame from the training data. Mixed… The frame will be randomly split into training, validation, and evaluation patches. This is the default setting. Training… The frame will be used exclusively to learn model parameters. Validation… The frame will be used exclusively for model validation during training. Models occasionally see this data, but never learn from it. Validation sets affect models, but only indirectly. This setting is applicable for deep models only. Evaluation… The frame will be used to calculate model scores. It is only used once a model is completely trained using the training and validation sets and should contain data that spans the various classes that the model would encounter. Monitoring… The frame will be used to show visual feedback during training, which can help you to evaluate the progress of training deep models (see Enabling Visual Feedback and Checkpoint Caches). You should note that only one frame can be designated for visual feedback. If you set a second frame to 'Monitoring', the original monitoring frame well be reset to 'Mixed' automatically. Note Some models need substantial data to train upon, in which case you would create large training sets. Models with very few hyperparameters will be easier to validate, so you can probably reduce the size of your validation set in this case. Conversely, if your model has many hyperparameters, you would want to have a large validation set. Finally, the train-validation-evaluation split ratio is also quite specific to use cases and it gets easier to make judgments as you train and build more and more models. |
| Pop-up menu | - |
You can right-click a frame or frames in the list and then choose the following:
Fit Frame(s) to View… Automatically centers and fits the selected frame or frames within views. Fill Selected Frame(s) from Multi-ROI… Lets you fill the selected frame or frames with the labeled voxels in a multi-ROI. You can choose the required multi-ROI in the Choose Multi-ROI dialog, shown below.
Fill Selected Frame(s) from Prediction… Lets you fill the selected frame or frames as per the selected (checked) model prediction. Merge Selected Frames… Lets you merge the selected frames into a new one. Duplicate Frame… Lets you create a copy of a frame. For example, in cases in which you may want to 'split' a frame into two frames. |
| Add |
|
Adds a new frame to the current view. |
| Import frame(s) from a multi-ROI |
|
Lets you import the frame(s) from a multi-ROI that was exported from the Segmentation Wizard. |
| Export all frames as a single multi-ROI |
|
Exports all frames as a multi-ROI. Exported frames will appear in the main context as a multi-ROI and are exported in the same shape as the loaded dataset(s). |
| Remove selected frame(s) |
|
Removes the selected frame or frames from the Input panel. |
| Show statistics for all training frames |
|
Opens the Frame Statistics dialog, shown below.
For each frame, the total number of voxels and training (labeled) voxels, as well as the number of voxels labeled for each class, is shown. In addition the percentage of voxels associated with each class label within the training data is indicated. |


Items related to classes and labels are available in the Classes and labels box.
Classes and labels
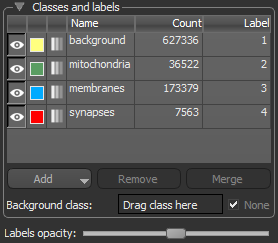
| Icon | Description | |
|---|---|---|
| Show/hide class |
|
Lets you show or hide the colored highlight applied to the labeled voxels within a class.
Note The opacity of the highlight is adjustable both locally and globally. |
| Color |
|
Is the color of the highlight applied to labeled voxels in a class. You can change the color by clicking the icon and then choosing another color in the Color dialog. |
| Local opacity |
|
Lets you adjust the opacity of the colored highlight for each class.
Click the Opacity icon in the Classes and labels list to open the Opacity slider, as shown below. You can then adjust opacity from 0 to 100 percent with the slider.
Note Whenever you change the opacity of a class, the global opacity settings will not be applied. However, you can right-click a class with an individually set opacity and then choose Use Global Opacity in the pop-up menu to reinstate the global opacity settings. |
| Name | - | Is the assigned class name, which can be edited. |
| Count | - | Is the total number of voxels labeled within a class. |
| Label | - | Is the assigned label number. |
| Add | - |
Lets you add a class or multiple classes.
Add Class… Automatically adds a new class. Add Multiple Classes… Lets you choose the number of classes to add. Note Modifying the number of classes while training is in progress will reset the current model(s). You will then have to retrain your model(s). |
| Remove | - |
Lets you remove the selected class.
Note Modifying the number of classes while training is in progress will reset the current model(s). You will then have to retrain your model(s). |
| Merge | - |
Lets you merge selected classes. The class name and color of the merged class will be those of the class selected first and that is identified as 'A'.
Note Modifying the number of classes while training is in progress will reset the current model(s). You will then have to retrain your model(s). |
| Background class | - |
If enabled, labeled voxels that are removed from any class will be added automatically to the set background class (see Setting a Class as the Background).
Do the following to set a class as the background:
|
| Labels opacity | - | Lets you adjust the opacity of all colored highlights applied to labeled voxels, except for those with a local opacity applied. |


The options on the Models tab let you enable or disable models, import trained models, as well as publish models for inference with the Segment with AI feature (see Segment with AI) or to continue training with the Deep Learning Tool (see Deep Learning Tool) or the Machine Learning Segmentation module (see Machine Learning Segmentation). A number of additional options are also available in the Model pop-up menu for deep models to edit the training parameters, display the training history, clear the checkpoint cache, and reset model weights,
Models tab

| Icon | Description | |
|---|---|---|
| Show/Hide Model Prediction |
|
If set to 'visible', the model's prediction will appear in the views at the bottom of the workspace. If set to 'hidden', the model's prediction will not appear in the workspace.
Note The maximum number of model predictions that can be shown at the same time is limited to three. |
| Train Model |
|
If checked, the model will be trained when you start a new training cycle. If not checked, the model will not be trained. |
| Name | - | Is the assigned name of the model, which can be edited if required. |
| Score | - |
Indicates the Dice score or precision of a model, which is a measure of the similarity of the model's prediction compared with the ground truth region. Using the same terms as describing accuracy, the Dice score is:
2 × number of true positives / 2 × number of true positives + number of false positives + number of false negatives In the above, the number of true positives is the number that the model finds, the number of positives is the total number of positives that can be found, and the number of false positives is the number of points that are negative and that the model classified as positive. Note Dice score is not only a measure of how many positives are found, but it also penalizes false positives. It is therefore more similar to precision than accuracy. The only difference is the denominator, which includes the total number of positives instead of only the positives that the model finds. Dice score also penalizes for the positives that the model could not find. |
| Pop-up menu | - |
You can right-click a deep model in the list and then choose the following in the pop-up menu:
Update Training Parameters… Opens the Training Parameters dialog, in which you can edit the model settings and data augmentation settings (see Training Parameters for Deep Models). Display Training History… Opens the Training Results dialog, in which you can review the results of the selected training session and load a model checkpoint (see Saving and Loading Model Checkpoints). Clear Checkpoint Cache… Clears the checkpoint cache. Reset Model Weights… Resets the model weights to their original values. Add to Strategy… Lets you add trained deep models to a user-defined strategy from the current Segmentation Wizard session to either a new strategy or to an existing user-defined strategy. This can be particularly useful if you often generate the same model(s) with edited training parameters. Note You can also add trained deep models to a user-defined strategy in the Model Generation Strategy dialog. To do so, click the Add New Model button on the dialog and then choose a trained model in the Pre-trained models list. |
| Generate New |
|
Opens the Model Generator dialog, in which you can generate new models (see Generating New Models). |
| Open Remote Library |
|
Opens the Remote Library of Ready-to-Use Segmentation Models dialog, in which you can browse for and download ready-to-use deep models to your local library (see Ready-to-Use Deep Models). Note Only single image modalities are supported by the current ready-to-use deep models. These models all have an input count of 1. |
| Import |
|
Opens the Import Model dialog, in which you can choose the model(s) that you want to import.
Note Only models that have the same number of classes as in the current Segmentation Wizard session will be shown in the dialog. Note When a model trained in Dragonfly’s Deep Learning Tool is imported into the Segmentation Wizard, only patch stride, data augmentation and callbacks will be updated. All other parameters will remain unchanged. |
| Model Generation Strategy |
|
Opens the Model Generation Strategy dialog, in which you can create new strategies, as well as edit saved ones (see Model Generation Strategies). |
| Publish |
|
Opens the Publish Models dialog, in which you can choose the models that you want to publish.
Note You need to 'publish' a model to make it available to other features of Dragonfly, such as Segment with AI and the Deep Learning Tool, for processing your data and other tasks. You can choose the models to publish and edit the default published name in the Publish Models dialog. Note The Publish Models dialog appears automatically whenever you exit the Segmentation Wizard. |
| Delete |
|
Deletes the selected model(s). |
| Compute Scores |
|
Lets you update not available (NA) scores. For example, in cases in which training was stopped manually and the model scores were not computed. |
| Details | - | Provides additional information about the selected model, such as the model type, architecture, and selected parameters. |
The options on the Settings tab, shown below, let you set your training preferences. You can choose to have new frames filled automatically with the best model prediction, as well as set a limit for model training.
Settings tab

| Description | |
|---|---|
| Automatically compute predictions for new frames |
If selected, predictions will be computed automatically whenever you add a new frame.
Automatically fill new frame with best prediction… If selected, new frames will be filled automatically with the best prediction. |
| Automatically fit selected frames to view | If selected, selected frames will be automatically fit to the original view. |
| Automatically compute and show, if possible, prediction(s) |
Lets you choose when predictions will be computed automatically and shown.
When loading a Segmentation Wizard Session Group… If selected, predictions will be computed automatically and shown, whenever possible, when a Segmentation Wizard Session Group is loaded. For imported model(s)… If selected, predictions will be computed automatically and shown, whenever possible, when models are imported. |
| If model performance does not improve |
Lets you set a limit for model training if the model's performance does not improve after a set number of training cycles. You should note that 'training cycles' are defined as the number of times the Train button is clicked. To determine performance, the scores of the last training cycles are compared.
Keep training the model… If selected, model training will be done each time that it is started, regardless of the scores of the last training cycles. Stop training the model… If selected, model training will be not start if the model's performance did not improve over the set number of training cycles. This is the default setting. In most cases, if a model's performance does not improve over a set number of training cycles, it is unlikely to improve with additional training. Delete the model… If selected, the model will be deleted if performance does not improve over the set number of training cycles. This setting can be used to help manage system resources, such as disk space. In addition, the total number of models is limited and you may decide that trying other models is a better strategy than keeping models that do not improve. |
| Limit total model count to | Lets you set the total number of models that can be generated or imported into a Segmentation Wizard session. |
| Enable model duplicates | Lets you allow or disallow model duplicates. This option should be enabled if you plan to generate multiple versions of the same model that are set with different parameters. |
| Use class weights inversely proportional to… |
If selected, class weights will be recomputed at training time as an inverse proportion of the labels in the training
data.
Note Using data proportional class weights can improve the training of semantic segmentation models in cases with significant class imbalances. |
